Author: GLover
FREENET INSTALLATION AND USER'S GUIDE
I
booted Freenet up for the first time in a while today, and seeing there
was an update available, thought i'd take the opportunity to use this
to write a guide to its installation, and then a little on its usage. A
little has changed since the last update I made, so it's good to be able
to start from fresh.
You will first need to go to
https://freenetproject.org/
where you can choose your installation. They cater to Windows, Mac, and
Linux, so no worries on compatibility issues. The download links are
displayed prominently on the front page of the website, so they're not
hard to find. Once you've downloaded it, begin the installation. You'll
be presented with the installer giving you the usual options on where to
install the program, and what shortcuts you want. Once you've decided
all this, it's time to click forward to the meat.
Freenet will
attach itself to either your default browser or a preferred one, which
means Google Chrome will be its first choice, with Firefox coming in
second (I believe), so it's best to set whatever browser you want as the
default before beginning the installation process, or if it starts up
with your preferred browser that's used for normal browsing, consider
changing your browsing to another one. There is another way around this,
and that's to manually open Freenet in your browser of choice, but i'll
come to that later on.
InstallationWhen Freenet begins to install, you'll be presented with the first choice:
Set Up FreenetChoose
Detailed settings (custom) - Choose custom security, and follow it to the next page.
Updating And PluginsYou can choose
Auto-update
here, or just go for the manual option. I'd recommend choosing not to
auto-update, as this is safer, and waiting until the new build has been
verified. There's a board on
Frost that will announce safe builds, but don't worry about that now (Guide coming soon!).
Who should Freenet connect to?Here you are presented with two options,
Connect to strangers or
Connect to friends. Always choose
Connect to strangers,
as your Freenet friends will need to know your IP address, and you
theirs. This is not a good idea if you're in a "free" country where
you're liable to spend decades in prison for looking at CP.
Network SecurityHaving chosen to connect to strangers, you can choose any option from
Low or
Normal. Choose
Normal, as this will offer the highest anonymity possible without connecting to "friends".
Physical SecurityThis
concerns how files and information are stored on your PC, and depends
on two things: paranoia and other encryption used. The option you choose
here is completely up to how safe you feel about others being able to
access your PC, and whether you have Truecrypt installed or not (you
should have this as standard!). The options are:
- NONE: Don't encrypt anything. (Choose only if you have Truecrypt etc installed)
-
LOW: Protect the downloads, uploads, and Freenet browsing cache, with a
persistent encryption key so they can be wiped quickly.
- HIGH: Protect the downloads, uploads, and Freenet browsing cache with a password.
-
MAXIMUM: Use a temporary encryption key, so that downloads, uploads and
Freenet browsing cache are wiped on restarting Freenet.
Assuming you have Truecrypt, and nobody can access the PC without your knowledge,
None you can choose no problem, but
Low is also a good option here, and I would recommend this as the lowest you go for.
High
has the benefit of a password, so that if you are paranoid, or just
unsure of others coming into contact with your PC, you can use this to
allow only yourself access. Anyone wishing to view Freenet needs this
password.
Maximum is for the tinfoil hat brigade, and I know we
all get like this at times. This wipes everything you've done when
Freenet is restarted, so nothing persists from session to session.
Datastore SizeFreenet
works like a cloud, with individual users providing storage space for
everything on the network. How much you wish to devote is up to you, but
you can provide anything from
512MiB to
100GiB. These
are set values, with no custom option available until Freenet is fully
installed. The more space you can provide, the faster your node will be,
so try to give as much as you can spare. A usual rule of thumb is
anything from 20GiB and up, but you will need to give it no less than
100GiB if you want to experience Freenet's full potential in regard to
speed.
Bandwidth LimitsYou are asked if your internet connection has data upload/download limits, and you are presented with a
Yes or
No option. If you have no data limits, just answer
No, but if you do, answer
Yes. You will then be asked to enter what that is, with options ranging from
25GB to
150GB, or a custom option.
Bandwidth LimitsThe next page asks you for your line speed, offering set options from
4Mbit to
100Mbit,
and a custom option if you're unlucky enough to have a really slow
connection, or a lucky enough bastard to have something ultra super
hyper fast, like a Gbit line. Freenet will not take your whole
bandwidth, but only a fraction of it, so if you have, say, a 100Mbit
line, it'll only take 16Mbit maximum for uploading/downloading. Remember
that you won't get those speeds unless the other Freenet nodes you
connect to have those speeds as well, so don't expect the impossible.
ConfigurationAfter
confirming the last option above, Freenet will launch in your default
(or its preferred) browser. Don't worry about this for now, as you're
not going to be viewing on-topic material yet, as there are a few things
to do first. The network will begin to boot itself up, and you'll have
to wait for it to connect. The first page to load is the bookmarks page (
Browsing > Browse Freenet), with a menu at the top listing different areas. They are:
Browsing
Community
Filesharing
Friends
Discussion
Status
Configuration
KeyUtils
If
you hover your mouse over each option, you'll notice a dropdown menu
appears offering further choices. Most of these you'll never have to
use, but i'll go into which ones you'll need. At the bottom of your
browser, you'll notice the following:
English Switch to advanced mode Security levels: NORMAL LOW [ 5 / 40 ]That's assuming you're in English, and that your
Network Security and
Physical Security are set to
Normal and
Low respectively. Click on
Switch to advanced mode
to increase the available options in the dropdowns at the top of the
page, and to facilitate an easier experience. The last part denotes how
many nodes you are connected to out of the maximum available. the
maximum number is chosen by how much bandwidth you give to it, 40 being
the maximum possible. The box with the node numbers in will change from
Red (not many) to Orange (enough to connect) to Green (healthy or very
healthy, and at full or near full speed).
PluginsOnce done, go to
Configuration > Plugins,
and click. At the top of the page, you'll notice a list of plugins
already installed by default, but you'll want to add another to the
list. Below this you'll see
WebOfTrust, a plugin that allows
you to create an identity in message boards. You can make as many
identities as you like once the plugin is installed, with none traceable
to any other, just like having different usernames on a forum, but most
of you won't need to do any of that.
Download FolderYou
may now want to change the download folder for files you download. You
don't have to do this, but I like keeping files in specific places, so
having them somewhere completely different is annoying. Highlight and
click on
Configuration > Core Settings, and scroll roughly two-thirds of the way down to
Default download directory. Click
Browse to change,
then browse to the folder you want your files to be downloaded to. To
browse, you'll see at the top of the list your drives (a:, c:, s:, etc),
so click on the preferred one. Keep selecting folders until the first
time you see the one you want to use, and click the
Select directory button to the left of it. If you go too far, you can always go back a folder by clicking the button with three periods on it.
When you've done all this, you'll see that the
Core settings menu has loaded back up, so scroll down to the bottom of that page and click
Apply.
This will save it. Do not touch any of the other settings on that page
unless you know what you are doing! You can also change the bandwidth
settings here, but I wouldn't worry about that.
Security LevelsYou can change the security levels at any time by highlighting and clicking
Configuration > Security Levels, so if you feel safer or become more paranoid, everything can be safely catered for in this menu.
Port ForwardingIf
you are behind a router, you may need to forward the OpenNet port if it
causes you issues. You won't necessarily have to do this, but it may
improve performance for you. Each router is different in its methods, so
i'd recommend looking up specific instructions on how to do that. The
port Freenet now uses is
UDP port 62484, which has changed since the last version. To check which port Freenet uses for yourself, go to
Configuration > Core settings, and look at the fourth option.
Before You Set OffBrowser ChangeYou
are now ready to browse some sites. At this point i'd recommend getting
a feel for Freenet rather than jumping right in, but i'd also recommend
changing browsers at this point if you haven't already done so. Open
your preferred Freenet browser, which should hopefully be a pristine
one, and go into Incognito Mode if it has one (this is preferred, as it
leaves less traces). Type the address
http://127.0.0.1:8888/
into the address bar, and wait for Freenet to load. Once it has done
so, close your other browser. At this point you may wish to do two
things: wiping browser history on the first browser, and changing the
new browser's homepage to
http://127.0.0.1:8888/. This will make life a lot easier for you.
Starting FreenetObviously
you'll want Freenet only to start in your preferred browser, so if it
automatically starts in a different one, you'll need to do the
following. When you start Freenet, there are two ways of doing it.
You'll have one link for
Open Freenet and one for
Start Freenet.
Choosing the latter will begin Freenet, but it won't open the browser.
Next you'll need to open your browser of choice, and either allow the
homepage to open (if you've set it to Freenet as above), or enter the
address manually/by bookmark. Once this is done, you'll just need to
wait for it to connect to Freenet, and you'll be ready.
That's
all there is to getting it up and running. It may seem a lot compared to
Tor's almost out of the box look, but once it's done, you'll not need
to do it again except maybe at the next update.
Using FreenetLoading SitesLoading Freesites is easy. If you're not on the Bookmarks page, go to
Browsing > Browse Freenet. You'll see two categories of bookmarks,
Directories of websites on Freenet and
Freenet related software and documentation.
It's the first category we want to look at, which has the directories
on. you can either left-click one of them, or right-click and open in
another tab. It's up to you, but i'd recommend opening it in another
tab, as this will make life easier later on. Try
Linkageddon
first, as this will show you hundreds of sites, all listed haphazardly.
Open any of the links you see in another tab, keeping the
Linkageddon
site open, to test whether things are working ok. You should notice a
page showing you that Freenet is searching for all the parts of the
Freesite, and when done, it will begin loading. Congratulations, you've
just successfully browsed Freenet!
What You Really WantNow we get onto what you really came here for: Porn.

Close the tab with the Freesite you just opened, unless, of course, you want to read it lol, and go back to
Linkageddon. Without even needing to scroll down, you'll see a box in the middle column advertising a website called
Moar. This has links to other CP sites, so go ahead and open it up. Once
Moar has loaded, you'll see a page which is poorly designed, and at the top left you'll see three options:
Moar!,
Even moar, and
Yet moar. Hovering the mouse cursor over any of them will bring up a dropdown menu, so hover over
Moar! and move the cursor over the
Pose option, opening up yet another dropdown menu. Go to
Tiny Americans and open it in another tab, then wait for the page to load.
Looking at the
Tiny Americans
Freesite should now have you very hard, or wet if you're a lady, and
your favored hand will now be reaching down towards what makes you
happy. Feel free to :jo now if you like, but you'll only be spoiling
what's to cum (lol). Scroll down to the bottom of the page, and you'll
notice a list of numbers and letters starting with
@chk. These are the keys you'll need to download .rar files of the photo sets you see above.
Bookmarking FreesitesBefore you go ahead and start fapping away, you may want to consider bookmarking the
Moar Freesite so that you can quickly find it later on. Highlight the address in the address bar, which should start out as
http://127.0.0.1:8888/freenet:USK@, and copy it. Go to the bookmarks tab (you kept it open, right?) and click on
My Bookmarks[Edit].
A new page will open up, displaying all your current default bookmarks
with icons next to them. These allow you to edit their name and
description, to delete them, to cut them out for pasting into another
category, and also to move them up and down their respective categories.
You won't need these, instead needing the
Add Bookmark icon
immediately to the right of the forward-slash at the top of the
bookmarks. You can also create a new category here, so feel free to play
around with that if you wish.
When you click the
Add Bookmark
icon, you'll need to paste the key to the freesite in the appropriate
box, then add a name. You can add a description and a short description
here if you wish. The short description will be what appears next to the
link on the bookmarks page, and the longer description will be what
appears when you hover the mouse cursor over it. You can tick the
Does the freesite have an activelink? box if you wish, but it's not important. Click the
Save box once finished, and you'll see the previous page reload. Click
Browsing > Browse Freenet again, and you'll see your new bookmark ready for use.
The
same can be done for any freesite, but some will have a link
specifically for bookmarking them. Look out for these, or just do it
manually as I showed you above.
Downloading From A KeyBack to the lovelies. On the
Tiny Americans freesite, highlight one of the keys, which should be
[email protected],
and copy it. Here is where it's handy to have kept the bookmarks page
open, as that has our menu on it. If you didn't do this, open another
tab and go to
http://127.0.0.1:8888, and wait for it to load. Once loaded, go to
Filesharing > Downloads,
and observe at the bottom of this page an empty box. Paste the key into
the box. Below the box you'll see two options for downloading:
to disk and
to temporary space. You're going to want to download
to disk,
so click the circle next to that option. To the right of this, you'll
see the location it's going to download to, which should be the default
folder you chose earlier, but don't click the
Download button yet. Below the two options, you'll see the following line:
Filter:
[/] Select this to run your request through the content filter. The
filter will try to prevent your computer from running anything which
might harm it, or break your anonymity. Keeping this checked is strongly
recommended.Whenever you download pictures (not in any
kind of archive file), or bare files, leave it ticked. Whenever you
download any archive file or movie file, untick the box, as Freenet may
flag them as potentially dangerous, and stop the download, which means
you'll have to tell it to ignore that and download. It just saves time
later on, which consists of unticking the box and clicking the download
button above it. Now you are all set to download the key, so click
Download, and you'll notice the page reload, and the file will now be in a nice green box at the top of the page under the heading
In Progress: Downloads (1).
To
the left of the green box is a tick box. Tick this, then move your eyes
to just above this, where you'll see two buttons, one saying
Remove files from list, and
Change priority of downloads, along with a dropdown saying
Low. Click the dropdown, and you'll see a list of priorities. Select
Very High, then click the
Change priority of downloads
button, and the page will reload, changing the color of the .rar file
to light red/orange. This shows that you've changed the priority of the
file, and it will expend more effort downloading it for you. And now a
warning. Whatever you do, DO NOT change the priority to
Emergency!
This may make it possible for a discerned attacker to find out what
you're looking for, so just don't do it! Only ever go up to
Very High.
You
may need to refresh the page every so often to check the file's
progress, but it can take a while, anywhere from 5 minutes to 5 hours.
This is the nature of Freenet. As long as a file is requested every so
often, it remains quite available in the cloud, being quick to download,
the more often it is requested increasing the speed at which it's
attainable. It takes a while for a file to die, but once it does, it can
be requested in the appropriate board in
Frost (guide coming
soon!). This file should be available (tested it myself), so once it's
downloaded, it'll appear under a new heading,
Completed downloads to download directory (1). At the bottom of this page, you'll also notice, in blue,
Messages: 1 Minor. Click this to see the messages page, which can also be accessed via
Status > Messages, and read that it's telling you that you've downloaded a file. Click the
Hide box below this, then once it disappears, go back to the
Filesharing > Downloads page.
Tick the box next to the file, then click the
Remove finished Downloads
box. This will remove it from the list, and you can safely open up the
downloads folder on your PC and see that the file has indeed downloaded.
You should know what to do here, so feel free to open it and enjoy
yourself .:jo ;D
Downloading From Multiple KeysGo back to the
Tiny Americans
Freesite, and highlight the rest of the keys at the bottom of the page.
Copy them, then paste the keys into the box at the bottom of the
Downloads
page. You can also highlight individual keys and do them one by one,
choosing only those you take a fancy to, but if you do this, you must
make sure that each individual key is on a different line. Remember to
uncheck the
Filter box so that you don't have to go through Freenet's paranoia, and remember to check the
to disk circle before clicking to download.
That's
all there is to downloading multiple files. You can also change the
priority of individual files, which speeds up the whole download process
for you. I usually like to do them in batches of 1-5, depending on the
size of them, but it also depends on your bandwidth. If the files are
small, say up to 30MB, doing them in groups of five will be fine, but
much bigger than this and you'll need to think about lowering the size
of the group. You can also grade them all, having some at
Very High, some at
High, and some at
Medium, etc, depending on how desperate you are to "view" the pictures.
Variations On Downloading MethodSometimes you won't be presented with a simple key to download from, so i'll go through a few other methods you may need to use.
Method 1You may come across a .rar file that's hidden behind a picture (usually a thumbnail). Go to the
Lolita Fix freesite below:
http://127.0.0.1:8888/freenet:USK@cobu0obfTHGlLUJrkHs8f~2gSqVrM~5sJbvmmMtzWXI,YsrGnCbiDqYd~Pplseud7VjSOFSNBjwtZe1Y2BOZIuM,AQACAAE/LolitaFix/0/You'll
notice at the bottom of that page that there is a list of the keys for
all the .rar files. Ignore them for now, and just pretend they aren't
there. You can do this one of two ways. Hover your mouse cursor over one
of the pictures, and you'll notice that it is clickable, the link
pointing to a
@CHK...rar key. You can either right-click the picture and
Copy Link Location (not the picture location), pasting this link into the keys box at the bottom of the
Downloads
page, or you can open the link directly. You should know what to do
when copying the key, which is the easiest thing to do here, but i'd
recommend clicking the picture and seeing what happens.
You'll notice that Freenet attempts to load it, but then changes the screen, displaying the following message:
Error: Unknown and potentially dangerous content type: application/rarDon't
worry about this, as it's just Freenet being paranoid, as I said
before. The bottom half of the page offers you several options, but the
only one we want is the one with the large
Download button, with the words
Download the file in the background... next to it. Click the
Download button, and it should open your
Downloads page, displaying the file in the download list. It's the long way round, but it may come in useful in future.
Method 2You may come across a thumbnail that opens into a larger picture, just as you find in imageboards, so first go to the
The PTHC Conexxion freesite below:
http://127.0.0.1:8888/freenet:USK@UZOXnPBnEMdqIOTVN4O7OyaGfaYJ19AnMoN4DZhl6Y0,8T8zhhNSZXAe5Y86aWSBgzxnIuS4kVFK7Zfd8YFZpZY,AQACAAE/pthc-conexxion/9/main.htmlOnce there, click on the
Girl Freesites
button, and wait for that page to load. This does take a while, so
please be patient here. Once loaded, you'll notice the top box entitled
Pthc-Conexxion Freesites. At the bottom of the box is another button labeled with
S24.
Click this and wait for it to load. This one doesn't take long. If you
hover your mouse cursor over any of the pictures, you'll see that they
at first glance can't be opened, but don't despair. If you now
right-click an image, you'll notice a menu. On this menu, to view the
picture, you can either select
View Image or
Copy Image Location, or whatever your browser's equivalents are:
View Image will open the image in the same tab.
Copy Image Location will copy the image's key, just like in
Method 1 with the .rar file. You can then either paste the key into the box on the
Downloads
page, or you can paste the key into another tab and open it separately.
It's up to you what you do here. Now, I can hear you thinking that it's
going to take a very long time to do this to each individual picture,
and you'd be correct, but there's a little shortcut you can take here.
If you're using Firefox like me, you can right-click the background and select
View Page Info. On the pop-up box that appears, select the
Media
tab, and see, in all their glory, every key to every picture. Do you
see where this is going? I hope so. Next you'll need to right-click any
of the keys on the
Media tab, and select
Select All. All the keys should now be highlighted, so just go ahead and right-click the blue mass that's just appeared, and select
Copy. If you now go to your
Downloads page, just paste the entire list of keys into the box at the bottom, and download away. You've got to love Firefox, eh?
ConclusionI
think that's everything you'll need to know to get started, and i've
given you a few sites to be looking through, so it should keep you busy
for the foreseeable future, but just in case that isn't enough, a post
will follow this one detailing every CP freesite I can find. This will
be updated as and when I find new ones, and if any information in the
above is incorrect, i'm more than happy to update it, or add that which
i've missed.
Keep an eye out, in the coming two weeks, for a
Frost
tutorial, as hinted at above a couple of times. I'll need some time for
this one, so please be patient. The amount of content on
Frost is mind-blowing.


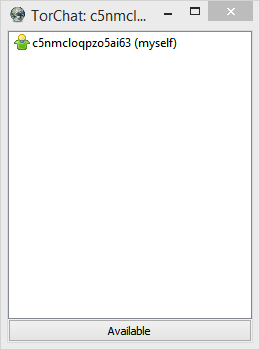
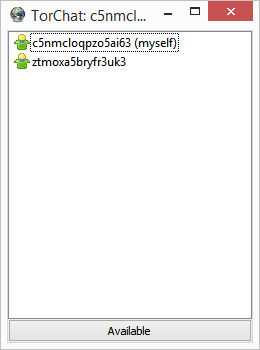
 What you get is an almost empty window, containing a puppet-like icon asided
by your brandnew torchat id and the word myself in brackets.
On start it's just a white icon.
You have to wait now until a two-way communication circuit is established. Even to yourself.
If it gets stable the icon becomes green.
What you get is an almost empty window, containing a puppet-like icon asided
by your brandnew torchat id and the word myself in brackets.
On start it's just a white icon.
You have to wait now until a two-way communication circuit is established. Even to yourself.
If it gets stable the icon becomes green.
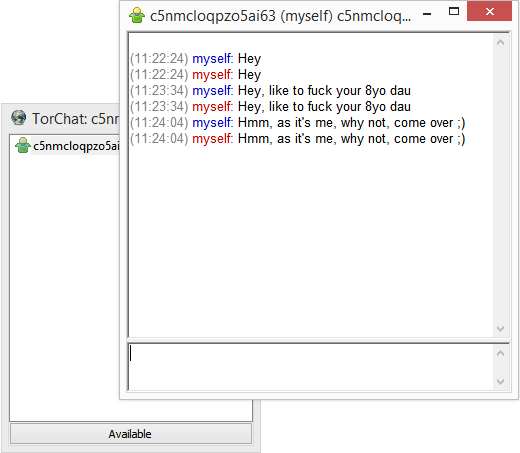
 Doubleclick yourself and try to chat with yourself as a first test.
 A rightclick into this window gives you a menu full of options. Different,
if you rightclick on a contact or in free window space.
Guess the most interesting now is 'Add contact...'. 'Cause there is no torchat-room anywhere we could connect to.
Torchatting is all one on one, and to be able to torchat with someone,
at least one of the two parties needs the torchat id of the other. If you have it it's straight forward.
A rightclick into this window gives you a menu full of options. Different,
if you rightclick on a contact or in free window space.
Guess the most interesting now is 'Add contact...'. 'Cause there is no torchat-room anywhere we could connect to.
Torchatting is all one on one, and to be able to torchat with someone,
at least one of the two parties needs the torchat id of the other. If you have it it's straight forward.
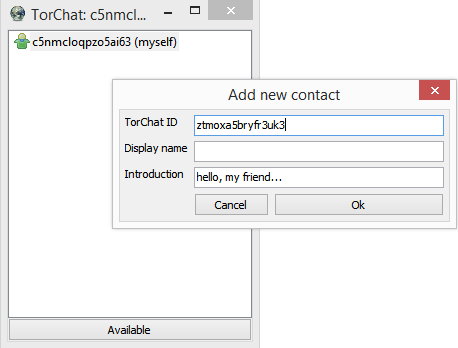 Click 'Add contact...', paste the id in appropriate field and click ok.
If the circuit establishes and your counterpart is online it will become a green icon and
both of you are free to send messages or even files.
Click 'Add contact...', paste the id in appropriate field and click ok.
If the circuit establishes and your counterpart is online it will become a green icon and
both of you are free to send messages or even files.
 If you now take a look back into the bin folder, you'll notice two new files. torchat.ini,
the base configuration (there's nothing to tweek inside for regular usage) and buddy-list.txt,
basically the content of torchat's root window in a text-file.
Guess that was everything you need to chat as safe as you take safety.
If I forgot something you (want to) know, you're encouraged to flood this thread with questions.
Even if your opinion differs ;)
Fap safe! Always!
################################################################
Forgot to mention.
To exit the application, do not just close the root window. This will most likely leave a running Tor client in memory. To exit, rightclick in the root window and click 'Quit' from the menu. This will tidy up everything as needed and quit.
#############################################################
Few links for the curious
The new GitHub project page, announcing TorChat2 (as of now there's only the pidgin plugin I mentioned shortly in threadstart), a rewrite in FPC.
---> TorChat Development @GitHub(CLEARNET!!)
https://github.com/prof7bit/TorChat
Also there to find, the TorChat Wiki (removed link to code.google.com for this one)
---> TorChat Wiki @GitHub(CLEARNET!!)
https://github.com/prof7bit/TorChat/wiki
TorChat on en.wikipedia.org
---> TorChat @Wikipedia(CLEARNET!!)
https://en.wikipedia.org/wiki/TorChat
And last but not least, an interview with Bernd Kreuss, author of TorChat, by Free Software Foundation
---> Interview with TorChat Author(CLEARNET!!)
https://www.fsf.org/blogs/licensing/interview-with-bernd-kreuss-of-torchat
###################################################################
For a given reason
If you are a Windoze TorChat user you should consider reading this one too:
---> TorChat Tor Client Upgrade HowTo
http://tkdxns4jiwbdjwce.onion/playpen/index.php/topic,3428.0.html
If you now take a look back into the bin folder, you'll notice two new files. torchat.ini,
the base configuration (there's nothing to tweek inside for regular usage) and buddy-list.txt,
basically the content of torchat's root window in a text-file.
Guess that was everything you need to chat as safe as you take safety.
If I forgot something you (want to) know, you're encouraged to flood this thread with questions.
Even if your opinion differs ;)
Fap safe! Always!
################################################################
Forgot to mention.
To exit the application, do not just close the root window. This will most likely leave a running Tor client in memory. To exit, rightclick in the root window and click 'Quit' from the menu. This will tidy up everything as needed and quit.
#############################################################
Few links for the curious
The new GitHub project page, announcing TorChat2 (as of now there's only the pidgin plugin I mentioned shortly in threadstart), a rewrite in FPC.
---> TorChat Development @GitHub(CLEARNET!!)
https://github.com/prof7bit/TorChat
Also there to find, the TorChat Wiki (removed link to code.google.com for this one)
---> TorChat Wiki @GitHub(CLEARNET!!)
https://github.com/prof7bit/TorChat/wiki
TorChat on en.wikipedia.org
---> TorChat @Wikipedia(CLEARNET!!)
https://en.wikipedia.org/wiki/TorChat
And last but not least, an interview with Bernd Kreuss, author of TorChat, by Free Software Foundation
---> Interview with TorChat Author(CLEARNET!!)
https://www.fsf.org/blogs/licensing/interview-with-bernd-kreuss-of-torchat
###################################################################
For a given reason
If you are a Windoze TorChat user you should consider reading this one too:
---> TorChat Tor Client Upgrade HowTo
http://tkdxns4jiwbdjwce.onion/playpen/index.php/topic,3428.0.html
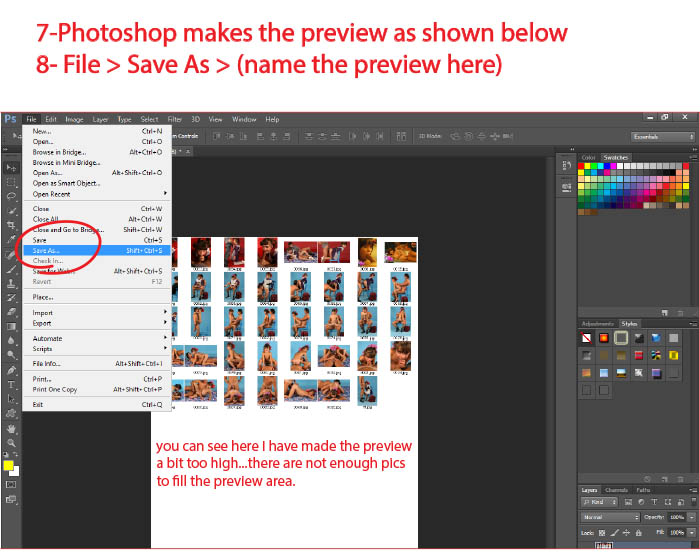
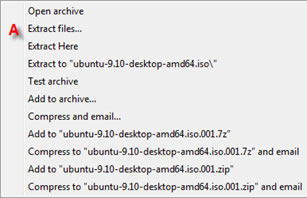
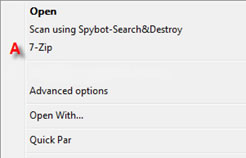 A � Select "Extract Files" Doing so will bring up another Window.
 A � Select "Extract Files" Doing so will bring up another Window.
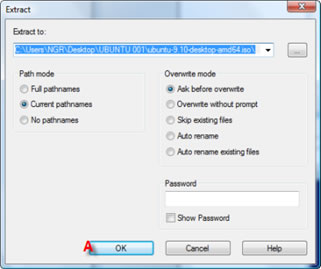 A � Decide where you would like to extract the .001 file and click OK. It should default as the same folder containing the .001 file set. After you click OK, it will bring up a status window.
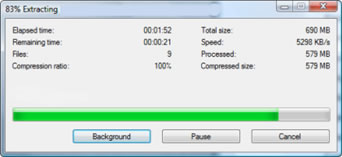 The status window will show you how much of the .001 extraction process is complete. Once 7zip is finished, it will dump the .001 file set into the same containing folder unless specified otherwise.
Then use appropriate program to open the file.
7-Zip file archiver: 7-Zip
http://czhbz6lv7rb67i56.onion/playpen/r/?http://7-zip.org/
The status window will show you how much of the .001 extraction process is complete. Once 7zip is finished, it will dump the .001 file set into the same containing folder unless specified otherwise.
Then use appropriate program to open the file.
7-Zip file archiver: 7-Zip
http://czhbz6lv7rb67i56.onion/playpen/r/?http://7-zip.org/
.jpg) Marsia gets fame just because she is so sexy!
Marsia gets fame just because she is so sexy!
 Nicole... just a total slut.
If twenty men walked up to her and started cumming on her face and in her mouth she would love it
and simply beg for some solid fucking to make it just perfect.
Really slutty girl.
Nicole... just a total slut.
If twenty men walked up to her and started cumming on her face and in her mouth she would love it
and simply beg for some solid fucking to make it just perfect.
Really slutty girl.
 Tabitha wins a prize for looking so cool in glasses and a pool toy. hot!
 BabyJ....
I don't have a single pic of babyJ,and video captures all look shit.
BabyJ is the classic alltime little sextoy.FullStop.
A list of girls worthy of praise.
Ariel ... a JB slut that makes me wanna hangout at junior high schools.
LauraB ... just for being so damn pretty - god she is lovely.
Luna ... such a patient girl to just lay her head on her arms while her Daddy fucks her ass so steadily.
Sammy ... "how do you get the pictures in the computer?" ha ha! so cute.
Kait ... sugar for loving her Daddy so much,... "you can do whatever you like Daddy"
SuzyQ , Maskgirl and Natty Datty for wanting to get fucked so badly.
and finally ... the cutest girl in the world...ever _no questions_no arguments_ isss
LITTLE MISS ALLI - THE CUTEST GIRL IN THE WORLD
BabyJ....
I don't have a single pic of babyJ,and video captures all look shit.
BabyJ is the classic alltime little sextoy.FullStop.
A list of girls worthy of praise.
Ariel ... a JB slut that makes me wanna hangout at junior high schools.
LauraB ... just for being so damn pretty - god she is lovely.
Luna ... such a patient girl to just lay her head on her arms while her Daddy fucks her ass so steadily.
Sammy ... "how do you get the pictures in the computer?" ha ha! so cute.
Kait ... sugar for loving her Daddy so much,... "you can do whatever you like Daddy"
SuzyQ , Maskgirl and Natty Datty for wanting to get fucked so badly.
and finally ... the cutest girl in the world...ever _no questions_no arguments_ isss
LITTLE MISS ALLI - THE CUTEST GIRL IN THE WORLD